
The Unified ATC system is a set of control features — PLC program, CNC macros, and front-end interface features — for operating many typical vertical machining centers with either umbrella-type (sliding carousel) or swing-arm type (side mount carousel) automatic tool changers.
PLC packages are available for controls based on the Oak board; on the GPIO4D board with and without the OpticDirect drive interface; on the All-in-one DC unit; and on the LegacyAdd interface to older RTK3 SD-drive systems.
Umbrella-type tool changers are also often called "non-random" tool changers, because any given tool is always stored in the same carousel location ("bin").
Swing-arm type tool changers are also often called "random access" tool changers, because the previous tool is put away in the carousel bin that the new tool just came out of. As a result, the carousel location of any given tool changes every time it is used.
This manual primarily applies to umbrella-type tool changers.
Tool descriptions and locations are stored in the Tool Library.
To get to the Tool Library, press F1/Setup → F2/Tool → F2/Tool Lib.
The Centroid tool library has space in its list for up to 200 tools. A typical machine might have 16 or 24 positions, or "bins", in the tool carousel.
You can use the Bin column in the Tool Library to specify which carousel bin a given tool is stored in.
If you are just starting out with an ATC machine, you will find it easiest to use only the first 16 or 24 tool numbers, so that your bin positions can match your tool numbers. When you become more comfortable with the Tool Library and the ATC, then you can expand your tool list and use all 200 tool numbers if you wish.
Use the F1/Clear Bin key on the Tool Library screen to clear the bin number for the selected tool, indicating that that tool is not in the carousel. If a tool is not in the machine, its Bin number will be shown as "-1". If a tool is currently in the spindle, its Bin number will be shown as "000".
Use the F2/ATC Reset key to verify or correct the state of the tool changer, usually after an error or fault during a tool change. See Recovering from Errors below for details.
You cannot change or clear the bin of the tool currently in the spindle, except through the F2/ATC Reset key.
When you run a CNC program cycle, the program will generally call out the tools it needs, when it needs them, and the control system will change tools automatically.
During setup and manual operations, you may need to have the machine change tools (put the current tool away in the carousel, and get out a different one) outside of any CNC program.
You can do that in one of two ways:


To remove a tool:
To load a tool:
* On some machines with CAT-standard tooling, it is important to orient the tool holder with the deeper notch towards the carousel when the spindle is oriented. If you have such a machine, you should mark the drive key which aligns to the deeper notch (the key which is toward the carousel when the spindle is oriented) so that you can always insert tool holders in the proper orientation.
When you load and unload tools by hand as described above, the control system and PLC do not register any change. If the control previously expected that Tool 7 was in the spindle, and planned to put it away in carousel bin 7 upon the next tool change, then that is still what it will expect, and what it will do.
The simplest way to load the desired tools into the carousel is through the spindle, using the F7/ATC key on the Setup menu, and the manual tool-release button on the machine head.
For example, suppose your next job requires tools #1, #2 and #7, and you have those tools on the tool cart in front of the machine.
Generally, no special codes are required in your CNC programs in order to use the automatic tool changer. The same M6 code works for both manual and automatic tool changing.
To change to a new tool, program T__ M6. If the machine and control are properly set up to use the tool changer, then the control will look up the location (bin number) for the requested tool, and the PLC system will put away the previous tool and pick up the new tool from its assigned bin.
Optionally, you can program M17 at the end of the last cut with each tool, as soon as the cutter is clear of the material, prior to moving Z to home and changing tools. M17 will turn off the spindle and coolant, and begin the spindle orientation sequence. This allows the spindle to orient while Z is moving to home, saving a few seconds in the tool change.
If you have some particularly long tools in the carousel, you can use the M50 and/or M51 codes to rotate the carousel after an M6 tool change is complete, in order to keep the longer tools away from a tall workpiece or fixture. M50 rotates the carousel forward one tool position. M51 rotates the carousel reverse one position. Repeat the codes as many times as needed to rotate multiple positions.
M50 and M51 do not change the put-away location for the tool in the spindle. When the next M6 tool change comes up, the PLC will rotate the carousel back around to the correct empty pocket before putting away the active tool.
If an error occurs which causes the automatic tool change sequence to be interrupted, you will need to take a few steps to ensure that the control is ready to run again, before you can restart the job.
First, you will need to return the tool changer components to their idle, "ready" positions. For an umbrella-type ATC, the ready positions are:
 If the carousel is not retracted out of the way, either use the Aux5 key
in Maintenance Mode (see below) or press
the mechanical override button on the carousel-out solenoid valve, if
your machine is so equipped.
If the carousel is not retracted out of the way, either use the Aux5 key
in Maintenance Mode (see below) or press
the mechanical override button on the carousel-out solenoid valve, if
your machine is so equipped.
If the carousel is not centered on a tool position, then use the
Aux8 (Tool Index -) or Aux9 (Tool Index +) keys to move it into an
aligned position. In this case, take particular care to verify that
the carousel position reported by the control (e.g. in the "Possible ATC Fault"
prompt below) is correct.
The next time you begin an automatic program cycle after a tool-change
failure — running a program,
homing after powerup, or using the F3/MDI prompt — the control will
display a message noting that the last tool change failed, and prompting you
to confirm the state of the tool changer.

The control will assume that no tool exchange has happened. Therefore, if the error which interrupted the tool change happened before the preceding tool was put away, you can generally just acknowledge the prompt by pressing the 'Y' key.
If the preceding tool did get put away, then you will need to use the F2/ATC Reset option in the Tool Library to tell the control which tool is now in the spindle; which carousel bin that tool should be put away in; and to what bin the carousel is currently rotated.
If the tool number or carousel position reported in the "Possible ATC Fault" message box is not correct, then you should press ESC or Cycle Cancel; go to the Tool Library screen (F1/Setup → F2/Tool → F2/Tool Library); and press F2/ATC Reset.

The control will first prompt you to verify the position of the tool carousel.
Enter the actual carousel position (bin number) that is aligned with the spindle.

The control will then prompt you to verify which tool is in the spindle.
Enter the tool number which is in the spindle.

Third, the control will prompt you for the carousel location in which to
put away the tool that is in the spindle. Enter the desired putback location.
This is usually the same as the tool number, but it can be any empty
carousel location.

Finally, the control will ask you to confirm that you want to reset the
tool changer, reminding you again that the chosen putback location must
be empty. To proceed, press 'Y'.
The control will update itself with the information you have entered. You should then be able to start and run the next program cycle without any complications.
The PLC program includes a "Maintenance Mode", which allows you to manipulate the tool changer components directly. This is primarily used in error recovery, but it can also be used to test or troubleshoot ATC components in isolation.
To switch Maintenance Mode on or off, press and hold the Aux12 key for one second. Aux12 is the blank gray key in the right-most column, immediately below the Aux9 or "Tool Index +" key. The LED in the Aux12 key will light up to indicate that Maintenance Mode is active.
You must cancel Maintenance Mode before you can again run normal program cycles.
In Maintenance Mode, the jog panel Aux keys have the following special functions:
 |
No function |  |
Orient spindle / cancel orient |  |
Unclamp/clamp tool |
 |
No function |  |
Retract carousel |  |
Advance carousel |
 |
No function |  |
Index Carousel Minus |  |
Index Carousel Plus |
| (Aux10) | No function | (Aux11) | No function | (Aux12) | Maintenance Mode On/Off |
| (Aux13) | No function | (Aux14) | No Function |
Also in Maintenance Mode, the following special M functions are available at the F3/MDI prompt:
| M15 | Unclamp tool |
| M16 | Clamp tool |
| M80 | Advance carousel to spindle |
| M81 | Retract carousel from spindle |
If a tool change fails for any reason, the PLC will store the state of
numerous inputs and flags in word variable W8. Use the Alt-I PLC Diagnostic
display to view the value in W8.

A separate program, named AWDecode.exe, is available to interpret and display the content of W8. You can launch AWDecode.exe from the Windows start menu. Enter the value from variable W8 in the box at the top of the AWDecode window. AWDecode will then show the state of the various input and flag bits which the PLC program has stored.
This information, combined with the actual error message which was displayed in the control's status window when the failure occurred, will often show exactly what went wrong.
In normal operation, the Auxiliary keys on the jog panel have the following functions:
|
No function | |
No function | |
No function |
|
No function | |
No function | |
No function |
|
Work Light On/Off | |
Index Carousel Minus | |
Index Carousel Plus |
| Aux10 | No function | Aux11 | No function | Aux12 | Maintenance Mode On/Off |
| Aux13 | No function | Aux14 | No Function |
Aux keys with no default function shown above are available for custom PLC-controlled features, or for features assigned through Machine Parameters 188-199. See Chapter 14 of the M-Series Operator's Manual.
The following M functions are part of the ATC system:
| M6 | Change Tools |
| M15* | Unclamp Tool |
| M16* | Clamp Tool |
| M17 | Prepare for Tool Change |
| M18 | Send ATC-Reset Request to PLC |
| M19 | Orient Spindle |
| M50 | Index Carousel Forward One Position |
| M51 | Index Carousel Reverse One Position |
| M80* | Advance the Carousel to the Spindle |
| M81* | Retract the Carousel from the Spindle |
* These functions are used in error recovery and maintenance, and are only available when Maintenance Mode is on.
See Chapter 13 of the Centroid M-Series Operator's Manual for descriptions of standard M functions.
You can use the PLC Diagnostic display on the console to view Centroid PLC input, output and memory locations.
At the control's main screen, press Alt-I to activate the PLC Diagnostic display. Press Alt-I again to dismiss it.
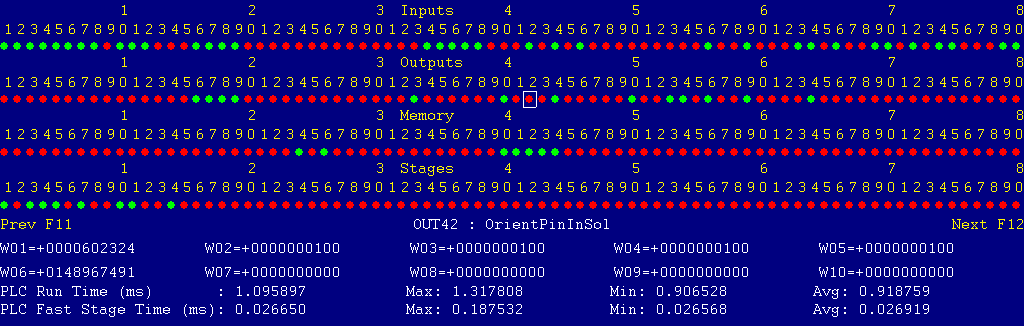
Each page of the Diagnostic display shows four rows of red and green dots: the first row shows PLC inputs 1 through 80; the second row PLC outputs 1 through 80; the third row PLC memory bits 1 through 80; and the fourth row PLC program stages 1 through 80.
You can use the arrow keys to move a highlight box over any of these locations. The name of the highlighted location will be displayed in the center of the screen below the red and green dots.
For example, in the illustration above the highlight box is on Output #42: The dot below the 2, to the right of the superscript 4, on the second line.
Below the four rows of bit status information are ten numeric ("word") variable values, labeled W1 through W10. Some of these variables also hold useful status information, described with the error and fault conditions to follow.
There are multiple pages of Diagnostic data. With the Alt-I diagnostic display showing, you can use the F12 and F11 keys to scroll right and left. For example, pressing F12 once will shift to the page showing inputs and outputs 81 through 160, and word variables W11 through W20.
The PLC system can "invert" inputs in its software, making a closed input appear open and an open input appear closed. This is useful when the PLC logic assumes one type of sensor (e.g. normally-closed) and the machine is built with another type (e.g. normally-open). If the PLC system is inverting an input, then that input will be shown on the PLC Diagnostic display with an overscore above it. The color of the dot will represent the inverted state, not the actual electrical state. In other words, a green dot with an overscore represents an electrically open input, which appears to the PLC logic to be a closed input.
The PLC program can generate numerous system-specific fault, error and warning messages, in addition to the general control messages listed in the Centroid operator's manual.
You can use the PLC Diagnostic display, described above, to view the Centroid PLC input, output and memory locations mentioned with these fault and error conditions.
Messages with 9000-series message numbers are Faults. After resolving the problem, you must press and release the Emergency Stop button to clear a Fault.
Messages with 8000-series message numbers are Errors. Errors will cancel the program cycle and stop the spindle and coolant, but they do not then need to be explicitly reset.
Messages with 5000-series and 2000-series message numbers are Warnings and Informational Messages. They do not cancel the cycle and do not require any action to reset.
The control detected an internal error in processing the PLC logic program.
Report this error to your dealer, along with the values from W14 and W15. Also report what function the machine was performing when the fault occurred.
You must shut down and cycle the power to clear this fault.
References:
PLC W14: Copy of internal SV_PLC_FAULT_STATUS, indicating the type of problem
PLC W15: Copy of internal SV_PLC_FAULT_ADDRESS, indicating the location of the problem
One of the servo amplifiers is reporting a fault condition.
If possible, check the LED display on the amplifier itself to see the specific fault code.
Press and release Emergency Stop to clear the fault.
References:
PLC MEM16: Axis #1 drive status.  Green = okay, Red = fault
PLC MEM17: Axis #2 drive status.  Green = okay, Red = fault
PLC MEM18: Axis #3 drive status.  Green = okay, Red = fault
PLC MEM19: Axis #4 drive status.  Green = okay, Red = fault
Schematic: Lines __
The control unit detected loss of communication from the operator panel in the Console.
Check for damage or disturbance to the cable between the console and the Oak control unit in the control cabinet.
Press and release Emergency Stop to clear the fault.
References:
Schematic: Lines __
The operator panel reported back to the control unit a loss of communication from the control unit. This indicates the return signal from the pendant is functioning normally, but the outgoing signal may have problems.
Check for damage or disturbance to the cable between the console and the Oak control unit in the control cabinet.
Press and release Emergency Stop to clear the fault.
References:
Schematic: Lines __
You exited the CNCM control software without first pressing Emergency Stop.
Always press Emergency Stop prior to exiting the control software.
Press and release Emergency Stop to clear the fault.
"9061 Mini PLC 1 Communication Fault"
The control lost communication with the PLC I/O expansion board.
Power down, open the cabinet, and check the connections at both ends of the gray cable which connects H8 on the Oak unit to H3 on the PLCADD1616 board.
Power up and check for a green "PLC OK" LED indication on the expansion board.
References:
PLC W36: bitmap of detected PLC expansion boards.  1 = one board detected
Machine Parameter 900: bitmap of expected PLC expansion boards.  1 = one board expected
Schematic: Lines __
The tool-clamped and the tool-unclamped switches were both closed at the same time.
This indicates faulty switches or damaged wiring.
References:
PLC INP__: Tool-clamped switch.  Green = closed = fully clamped.  Red = open = not fully clamped
PLC INP__: Tool-unclamped switch.  Green = closed = fully unclamped.  Red = open = not fully unclamped
Schematic: Lines __
The carousel-in and the carousel-out switches were both closed at the same time.
This indicates faulty switches or damaged wiring.
References:
PLC INP__: Carousel-out switch.  Green = closed = fully retracted.  Red = open = not fully retracted
PLC INP__: Carousel-in switch.  Green = closed = fully advanced.  Red = open = not fully advanced
Schematic: Lines __
You attempted to start an automatic program cycle, but Maintenance Mode (Aux12) is still active.
Press and hold the Aux12 key for one second to cancel Maintenance Mode.
"8181 ATC TOOL COUNTER NOISE (1)"
During ATC carousel rotation, the tool counter sensor opened sooner than expected when moving out of one tool position and into the in-transit state. This may indicate that the tool-counter input is affected by electrical noise, leading to false position counting.
This may also indicate that the rest position at the end of a previous carousel rotation was too close to the edge of the Geneva cam, perhaps due to a failing brake in the carousel rotation motor.
Use the Aux8 and/or Aux9 carousel index keys to rotate the carousel another position or two, so that it is again centered on one of the tool bins. Then press Alt-K to view the current carousel bin recorded in the software. If the recorded position does not match the actual position, perform an ATC Reset in the Tool Library.
References:
PLC INP__: Tool counter sensor.  Green = closed = in position.  Red = open = between positions
PLC W17: Current carousel position, as recorded by the PLC program
Schematic: Lines __
During ATC carousel rotation, the tool counter sensor did not open, to indicate rotation from one tool position into the in-transit state, within the expected time. This may be because the sensor is faulty or out of position, so that it did not detect the movement. This may also be because the carousel failed to move, perhaps due to a failure to get power to the motor.
References:
PLC INP__: Tool counter sensor.  Green = closed = in position.  Red = open = between positions
PLC OUT__: Carousel motor enable relay.  Green = on = motor powered.  Red = off
PLC OUT__: Carousel motor direction relay.  Green = rotate reverse.  Red = rotate forward
PLC W17: Current carousel position, as recorded by the PLC program
Schematic: Lines __
During ATC carousel rotation, the tool counter sensor closed sooner than expected when moving from the in-transit state into the next tool position. This may indicate that the tool-counter input is affected by electrical noise, leading to false position counting.
Use the Aux8 and/or Aux9 carousel index keys to rotate the carousel another position or two, so that it is again centered on one of the tool bins. Then press Alt-K to view the current carousel bin recorded in the software. If the recorded position does not match the actual position, perform an ATC Reset in the Tool Library.
References:
PLC INP__: Tool counter sensor.  Green = closed = in position.  Red = open = between positions
PLC W17: Current carousel position, as recorded by the PLC program
Schematic: Lines __
During ATC carousel rotation, the tool counter sensor did not close, to indicate rotation from the in-transit state to the next tool position, within the expected time. This may be because the sensor is faulty or out of position, so that it did not detect the movement. This may also be because the carousel stopped moving, perhaps due to a mechanical jam or to a failure to get power to the motor.
References:
PLC INP__: Tool counter sensor.  Green = closed = in position.  Red = open = between positions
PLC OUT__: Carousel motor enable relay.  Green = on = motor powered.  Red = off
PLC OUT__: Carousel motor direction relay.  Green = rotate reverse.  Red = rotate forward
PLC W17: Current carousel position, as recorded by the PLC program
Schematic: Lines __
The PLC received a tool-change or tool prestage request for an invalid carousel position: a position that is not between 1 and the number of positions specified in Machine Parameter 161.
References:
Machine Parameter 161: number of positions in the tool carousel
PLC W10: Carousel position that was requested by the CNC
PLC W19: PLC copy of Parameter 161, number of positions in the tool carousel
An automatic tool change was requested, but there is not sufficient air pressure to operate the pneumatic ATC components.
Verify that air is connected and turned on, and that pressure is within the range specified by the machine builder.
If this error occurs in the middle of a tool change, you may need to increase the size of the supply line, or install an accumulator tank, in order to maintain pressure at the machine during tool changes.
References:
PLC INP__: Air pressure switch.  Green = closed = good pressure.  Red = open = low or no pressure
Schematic: Lines __
During an automatic tool change, or after an M19 spindle orientation for any other purpose, the spindle failed to maintain its orient position.
This is usually due to some sort of external disturbance, such as excessive force on the tool or tool holder.
Orientation is considered lost if the spindle position is outside the window set in Machine Parameter 775 for more than one half second.
References:
Machine Parameter 775: Orientation window half-width, in counts of the spindle encoder
PLC MEM34: Orient complete flag.  Green = 1 = in orient.  Red = 0 = out of orient
Schematic: Lines __
The control received, or thought it received, a command to rotate the spindle (either to run, to orient, or to shift gears if applicable) while the tool drawbar was in the unclamped position.
References:
PLC MEM21: Spindle-run flag.  Green = 1 = spindle should be running in normal operation
PLC MEM24: Run-for-orient flag.  Green = 1 = spindle should be running in order to orient
PLC INP__: Tool-clamped switch.  Green = closed = fully clamped.  Red = open = not fully clamped
PLC INP__: Tool-unclamped switch.  Green = closed = fully unclamped.  Red = open = not fully unclamped
Schematic: Lines __
During an automatic tool change, or after an M19 orientation request for
any other purpose, the spindle failed to come to a stop so that
orientation could proceed.
"8211 ATC NOT READY: MZ_ACK"
During an automatic program cycle, with no tool change in progress, the signal from the CNC to the PLC which reports that initial head positioning for a tool change is complete was set (1). This flag should only be set for short intervals during a tool change.
Report this condition to your dealer.
"8212 ATC NOT READY: TOOL CLAMP INP"
During an automatic program cycle, with no tool change in progress, the tool-clamped switch was open.
This indicates either a malfunctioning or out-of-position switch, or an uncommanded tool release.
References:
PLC INP__: Tool-clamped switch.  Green = closed = fully clamped.  Red = open = not fully clamped
Schematic: Lines __
During an automatic program cycle, with no tool change in progress, the tool-unclamped switch was closed.
This indicates either a malfunctioning or out-of-position switch, or an uncommanded tool release.
References:
PLC INP__: Tool-unclamped switch.  Green = closed = fully unclamped.  Red = open = not fully unclamped
Schematic: Lines __
During an automatic program cycle, with no tool change in progress, the tool-counter input was open.
This usually indicates that the tool carousel is out of position, perhaps due to an error or interruption in a preceding tool change.
It could also indicates a malfunctioning or out-of-position sensor, or uncommanded carousel movement.
References:
PLC INP__: Tool counter sensor.  Green = closed = in position.  Red = open = between positions
Schematic: Lines __
During an automatic program cycle, with no tool change in progress, the signal from the CNC to the PLC which reports head-up movement complete after unloading a tool was set (1). This flag should only be set for short intervals during a tool change.
Report this condition to your dealer.
"8222 ATC NOT READY: HD_ACK"
During an automatic program cycle, with no tool change in progress, the signal from the CNC to the PLC which reports head-down movement complete over a new tool was set (1). This flag should only be set for short intervals during a tool change.
Report this condition to your dealer.
"8223 ATC NOT READY: CAROUSEL_OUT INP"
During an automatic program cycle, with no tool change in progress, the carousel-out switch was open, indicating that the carousel is not fully retracted.
This is usually due to an out-of-position switch. It could also be due to the carousel drifting or getting pushed out of its retracted position.
References:
PLC INP__: Carousel-out switch.  Green = closed = fully retracted.  Red = open = not fully retracted
Schematic: Lines __
During an automatic program cycle, with no tool change in progress, the carousel-in switch was closed, suggesting that the carousel is advanced under the spindle.
This is usually due to an out-of-position switch. It could also be due to the carousel having been left in the advanced position after a failed tool change.
If the carousel is advanced, use the Maintenance Mode controls to retract it.
References:
PLC INP__: Carousel-in switch.  Green = closed = fully advanced.  Red = open = not fully advanced
Schematic: Lines __
During an automatic tool change, the PLC requested that the CNC move the head into its initial position (tool-changing height), but the CNC did not report the move complete within the allowed time.
This can occur if Z axis movement is slowed or paused during the
tool change. Avoid pressing Feed Hold while a change is in progress.
"8242 ATC NEW TOOL ROTATION TIMEOUT"
During an automatic tool change, carousel rotation to the requested
tool did not complete within the allowed time.
"8243 ATC ORIENT TIMEOUT"
During an automatic tool change, the spindle did not reach and hold its orient position within the allowed time.
References:
PLC MEM34: Orient complete flag.  Green = 1 = in orient.  Red = 0 = out of orient
Schematic: Lines __
During an automatic tool change, the drawbar failed to open and release the old tool within the allowed time.
References:
PLC OUT__: Tool-unclamp solenoid.  On = open drawbar, unclamp tool
PLC INP__: Tool-unclamped switch.  Green = closed = fully unclamped.  Red = open = not fully unclamped
Schematic: Lines __
During an automatic tool change, the drawbar failed to close and grip the new tool within the allowed time.
References:
PLC OUT__: Tool-unclamp solenoid.  On = open drawbar, unclamp tool
PLC INP__: Tool-clamped switch.  Green = closed = fully clamped.  Red = open = not fully clamped
Schematic: Lines __
During an automatic tool change, the CNC did not acknowledge the completion
signal from the PLC within the allowed time.
"8251 ATC CAR IN NOISE"
While advancing the carousel to the spindle during an automatic tool change, the PLC saw the carousel-in switch close in significantly less time than it should have taken for the carousel to move.
This suggests a false input, caused by noise or by a faulty switch.
References:
PLC INP__: Carousel-in switch.  Green = closed = fully advanced.  Red = open = not fully advanced
Schematic: Lines __
During an automatic tool change, the carousel did not advance under the spindle within the allowed time.
This may be due to an obstruction (such as an unexpected tool in the put-back pocket); or due to a pneumatic failure (so that the carousel did not move at all); or due to a faulty or out-of-position sensor (so that the PLC did not recognize that the carousel was fully advanced).
References:
PLC INP__: Carousel-in switch.  Green = closed = fully advanced.  Red = open = not fully advanced
Schematic: Lines __
During an automatic tool change, while waiting for the carousel to advance
in to the spindle, spindle orientation was lost.
"8255 ATC HEAD UP TOOL NOT UNCLAMPED"
During an automatic tool change, while waiting for the CNC to move the head up off of the old tool, the tool-unclamped switch opened.
This suggests that the drawbar failed to remain open, and perhaps that the tool is once again gripped in the spindle.
Check that the air supply is adequate, and that the drawbar cylinder is not leaking.
References:
PLC INP__: Tool-unclamped switch.  Green = closed = fully unclamped.  Red = open = not fully unclamped
Schematic: Lines __
During an automatic tool change, the PLC requested that the CNC move the head up to get clear of the just-released tool, but the CNC did not report the move complete within the allowed time.
This can occur if Z axis movement is slowed or paused during the
tool change. Avoid pressing Feed Hold while a change is in progress.
"8258 ATC HEAD DOWN TIMEOUT"
During an automatic tool change, the PLC requested that the CNC move the head down to engage the new tool, but the CNC did not report the move complete within the allowed time.
This can occur if Z axis movement is slowed or paused during the
tool change. Avoid pressing Feed Hold while a change is in progress.
"8259 ATC HEAD DOWN TOOL NOT UNCLAMPED"
During an automatic tool change, while moving the head down to engage the new tool, the tool-unclamped switch opened.
This suggests that the drawbar failed to remain open, which would result in a crash against the pull stud of the new tool.
References:
PLC INP__: Tool-unclamped switch.  Green = closed = fully unclamped.  Red = open = not fully unclamped
Schematic: Lines __
While retracting the carousel away from the spindle during an automatic tool change, the PLC saw the carousel-out switch close in significantly less time than it should have taken for the carousel to move.
This suggests a false input, caused by noise or by a faulty switch.
References:
PLC INP__: Carousel-out switch.  Green = closed = fully retracted.  Red = open = not fully retracted
Schematic: Lines __
During an automatic tool change, the carousel did not retract away from the spindle within the allowed time.
This may be due to an obstruction; or due to a pneumatic failure (so that the carousel did not move at all); or due to a faulty or out-of-position sensor (so that the PLC did not recognize that the carousel was fully retracted).
References:
PLC INP__: Carousel-out switch.  Green = closed = fully retracted.  Red = open = not fully retracted
Schematic: Lines __
During an automatic tool change, carousel rotation to the requested
tool did not complete within the allowed time.
"8270 M15 FAULT NO ORIENT/ZERO SPEED"
The Maintenance Mode M15 code was programmed, to unclamp the tool from the spindle, but the spindle was still running.
References:
PLC INP__: Spindle zero-speed signal.  Green = zero speed (stopped).  Red = running
PLC MEM21: Spindle run request.  Green = run.  Red = stop
PLC MEM25: Spindle-stopped flag.  Green = stopped.  Red = running
Schematic: Lines __
The PLC program requested display of a message on the screen, but the provided message code was not valid.
This indicates an error in the PLC program. Report the message to your dealer, along with the value in PLC variable W16.
References:
PLC W16: stores the invalid message code
The PLC hardware detected the presence of an I/O expansion board, but the setting of Machine Parameter 900 did not tell it to expect that board in the system.
On the basic ATC systems supported here, there should be one I/O expansion board installed, and Machine Parameter 900 should be set to 1.0.
References:
PLC W36: bitmap of detected PLC expansion boards.  1 = one board detected
Machine Parameter 900: bitmap of expected PLC expansion boards.  1 = one board expected
The program attemped to run an M3 spindle-start code, but the control is still in Manual Spindle mode.
Press the SPIN AUTO/MAN key in the top row of the operator panel
to select Auto mode (LED on); then press CYCLE START to
resume program operation.
"2021 Axis Faults Cleared"
A previous servo drive fault condition has been resolved,
and cleared with Emergency Stop.
"2024 PLC Faults Cleared"
A previous PLC fault condition has been resolved,
and cleared with Emergency Stop.
"2035 KEYBOARD JOGGING DISABLED"
You inadvertently pressed a keyboard combination that is
used for keyboard jogging controls, but keyboard jogging
features have been disabled on this machine.
"2099 Message Cleared"
A previous fault condition has been cleared with Emergency Stop.
"2185 TOOL NOISE FAULT CLEARED"
This message should appear after an 8181 or 8183 error (see above), when
you jog the carousel back into a known position.
"2201 --- ATC INITIALIZED ---"
This message is displayed after an ATC Reset or ATC Init operation, to
show that the PLC has updated its carousel-position and tool-number
values.
![]()